# How to Install Fedora 42 with Full Disk Encryption, Snapshot, and Rollback Support
> [!ATTENTION] This is an archived copy - I DID NOT write this
> This is [a direct copy of this excellent write up by Madhu Desai](https://sysguides.com/install-fedora-42-with-full-disk-encryption-snapshot-and-rollback-support) that I saved for my own personal reference while using this as a baseline install guide. Please refer to the linked write up for any updates and to see the comment discussion
Fedora Linux 42 is here!
Fedora Workstation 42 debuts with GNOME 48, featuring a refreshed interface, smarter notifications, and smoother animations thanks to triple buffering. The new Anaconda Web UI installer makes setting up Fedora more intuitive than ever, and behind the scenes, performance continues to improve across the board.
This time around, I’m stepping things up.
With Fedora 42, I’ve rethought the setup process from the ground up. Drawing from the simplified method I used in my [Arch Linux with Snapshots & Rollback series](https://www.youtube.com/playlist?list=PLXtO73SnHrrJeRb53DigRNYmAqXh2ZxX-), this approach trims down complexity while still delivering a stable and reliable system. It’s faster to set up, easier to manage, and works great whether you’re new to Fedora or a seasoned user.
In my previous Fedora 42 guide, I showed how to enable Btrfs snapshots and rollback support using a streamlined method that favored simplicity and speed. It was ideal for users who wanted rollback functionality without dealing with encryption.
If that sounds like what you need, check out [this version of the guide without LUKS encryption](https://sysguides.com/install-fedora-42-with-snapshot-and-rollback-support).
But what if you want all that—**plus full disk encryption?**
In this updated guide, I’ll walk you through how to install Fedora 42 with full disk encryption, snapshot, and rollback support using Btrfs. You’ll get the best of both worlds: a secure system that’s also easy to restore when things go sideways.
Let’s lock it down, back it up, and roll it back when needed. A smarter, safer Fedora system starts here.
## Table of Contents
- [1. Partitions and Subvolumes Layout](https://sysguides.com/install-fedora-42-with-full-disk-encryption-snapshot-and-rollback-support#1-partitions-and-subvolumes-layout)
- [2. Install Fedora Workstation 42](https://sysguides.com/install-fedora-42-with-full-disk-encryption-snapshot-and-rollback-support#2-install-fedora-workstation-42)
- [3. Post-Installation Configuration](https://sysguides.com/install-fedora-42-with-full-disk-encryption-snapshot-and-rollback-support#3-postinstallation-configuration)
- [4. Prepare Home for Snapshots and Rollbacks](https://sysguides.com/install-fedora-42-with-full-disk-encryption-snapshot-and-rollback-support#4-prepare-home-for-snapshots-and-rollbacks)
- [5. Bypass the Additional Passphrase Prompt](https://sysguides.com/install-fedora-42-with-full-disk-encryption-snapshot-and-rollback-support#5-bypass-the-additional-passphrase-prompt)
- [5.1 Using a Key File](https://sysguides.com/install-fedora-42-with-full-disk-encryption-snapshot-and-rollback-support#51-using-a-key-file)
- [5.2 Using TPM2](https://sysguides.com/install-fedora-42-with-full-disk-encryption-snapshot-and-rollback-support#52-using-tpm2)
- [6. Set Up Snapper, grub-btrfs, and Btrfs Assistant](https://sysguides.com/install-fedora-42-with-full-disk-encryption-snapshot-and-rollback-support#6-set-up-snapper-grubbtrfs-and-btrfs-assistant)
- [7. Enable Automatic Timeline Snapshots](https://sysguides.com/install-fedora-42-with-full-disk-encryption-snapshot-and-rollback-support#7-enable-automatic-timeline-snapshots)
- [8. Conclusion](https://sysguides.com/install-fedora-42-with-full-disk-encryption-snapshot-and-rollback-support#8-conclusion)
## 1. Partitions and Subvolumes Layout
In this setup, I’m installing Fedora 42 on a 128 GiB disk with **full LUKS encryption**, along with **Btrfs snapshots and rollback support**. The goal is a secure, efficient system that stays simple to manage—and can easily roll back changes after kernel updates or system configuration tweaks.
This is how the disk partition looks:
**NAME SIZE FSTYPE PARTTYPENAMEPARTTYPENAME MOUNTPOINT**
/dev/vda 128G
├─/dev/vda1 1G vfat EFI System /boot/efi
└─/dev/vda2 127G btrfs (LUKS) Linux filesystem /
- No separate `/boot` partition: The kernel and initramfs will reside inside the Btrfs root, so when a rollback occurs, the kernel is also rolled back—avoiding mismatches and boot issues.
- No swap partition: Fedora automatically enables **SwapOnZRAM** at boot, so no separate swap partition is required.
Here are the Btrfs subvolumes I'll create inside the second partition (`/dev/vda2`), along with their mount points and purposes:
- **`root`** → `/`
The root filesystem, where Fedora is installed. This is the main subvolume and will be snapshot-enabled.
- **`home`** → `/home`
User data and configuration files. This subvolume will also be snapshot-enabled, which is why `.mozilla` is separated below.
- **`opt`** → `/opt`
Isolates optional or third-party software installations.
- **`cache`** → `/var/cache`
Avoids bloating system snapshots with package caches.
- **`gdm`** → `/var/lib/gdm`
Required for GNOME (Workstation Edition). Without this, read-only snapshots may cause login issues.
- **`libvirt`** → `/var/lib/libvirt`
Isolates virtual machine data (useful if you use KVM/QEMU/libvirt).
- **`log`** → `/var/log`
Prevents constantly changing log files from filling up snapshot space.
- **`spool`** → `/var/spool`
Separates queued print jobs or mail data from root.
- **`tmp`** → `/var/tmp`
Keeps temporary files out of snapshots.
- **`.mozilla`** → `/home/$USER/.mozilla`
Keeps Firefox data out of `/home` snapshots, improving rollback speed and stability.
This layout ensures that snapshots stay clean, manageable, and efficient. It also separates volatile or large data directories so they don't interfere with the rollback process.
**Optional subvolumes (not created):**
- **`crash`** → `/var/crash`
Only needed if `kdump` is enabled and you plan to analyze kernel crash dumps.
- **`www`** → `/var/www`
Useful for isolating web server data, if you're running a website or self-hosted services.
- **`google-chrome`** → `/home/$USER/.config/google-chrome`
Separating this can keep browser cache and settings out of `/home` snapshots for cleaner rollbacks.
- **`BraveSoftware`** → `/home/$USER/.config/BraveSoftware`
Same as above—helps reduce snapshot size and keeps session data isolated.
- **`.gnupg`** → `/home/$USER/.gnupg`
Useful if you want to exclude GPG keys and trust settings from being affected by rollbacks.
- **.ssh** → `/home/$USER/.ssh`
Keeps your SSH keys and configurations stable and unaffected by snapshot restores.
- **`.thunderbird`** → `/home/$USER/.thunderbird`
Helps preserve mail client data and cache separately from `/home` snapshots.
## 2. Install Fedora Workstation 42
Boot your system using the **Fedora 42 Workstation Live installer** in **UEFI mode**.
When the **"Welcome to Fedora"** window appears, click **"Not Now"** to skip the initial setup and return to the GNOME desktop.
By default, the Anaconda Web UI installer does not support encrypting the /boot partition, which is required for full LUKS encryption. To enable this feature, we’ll modify two internal configuration files used by the installer and storage stack.
Open the **Terminal**—you’ll need to make a couple of quick changes to enable full disk encryption.
First, switch to superuser (root) mode:
```
$ sudo -i
```
Then, run the following command to enable encryption support:
```
# sed -i.bkp 's/encryption_support = False/encryption_support = True/' \
/usr/lib64/python3.*/site-packages/pyanaconda/modules/storage/bootloader/base.py
```
This change enables the option to encrypt /boot during installation, allowing for full disk encryption.
With /boot encryption support enabled, proceed to launch the Anaconda Web UI installer. Leave the terminal window open for now, as we’ll return to it once the installation is finished.

The redesigned **Anaconda Web UI** will now appear, offering a more modern and streamlined installation experience. As of now, this web-based interface is only available in **Fedora Workstation 42**.
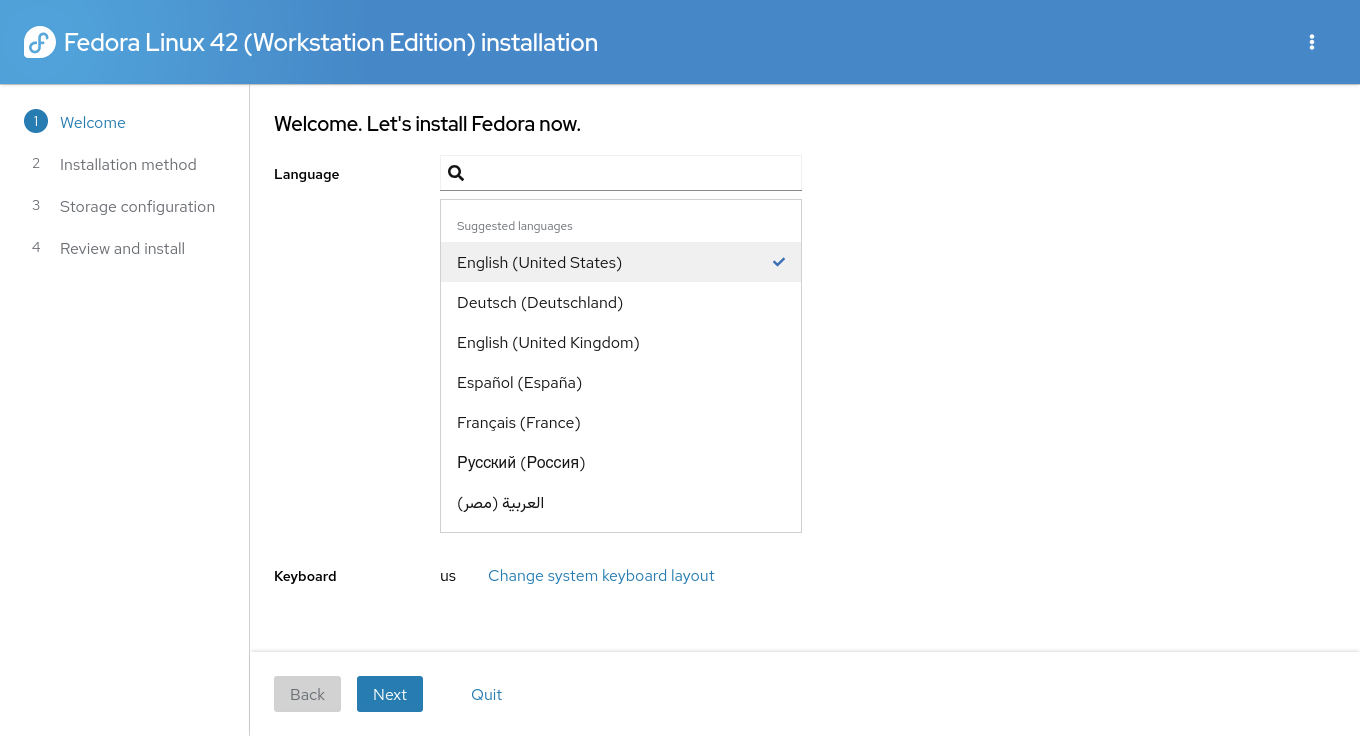
On the **Welcome** screen, choose your preferred **language** and **keyboard layout**, then click **Next**.
On the **Installation Method** screen, configure how Fedora should be installed — including disk selection and partition layout.
Ensure that the correct installation disk is selected under the **Destination** section. For example, in this guide, the target disk is vda (/dev/vda). If it is not already selected, click the **Change Destination** link and choose the appropriate disk.

Since this guide uses a **custom disk layout**, do not use the default **“Use entire disk”** option. Click the **three-dot menu** (⋮) at the top-right corner and select **Launch Storage Editor**.
A warning will appear indicating that the Storage Editor is an advanced tool and that changes take effect immediately.

Click **Launch storage editor** to proceed.
In the **Storage Editor**, begin by creating a new partition table.
> ⚠️ _Warning: This will erase all existing partitions on the selected disk. If you are dual-booting or have existing data, do not proceed with this step._
Since this example uses a blank disk, proceed by clicking the **three-dot menu** (⋮) and choosing **Create partition tab**
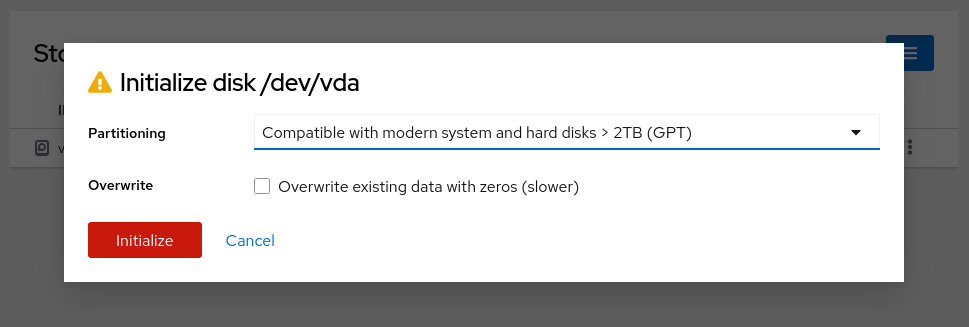
Click **Initialize** to confirm.
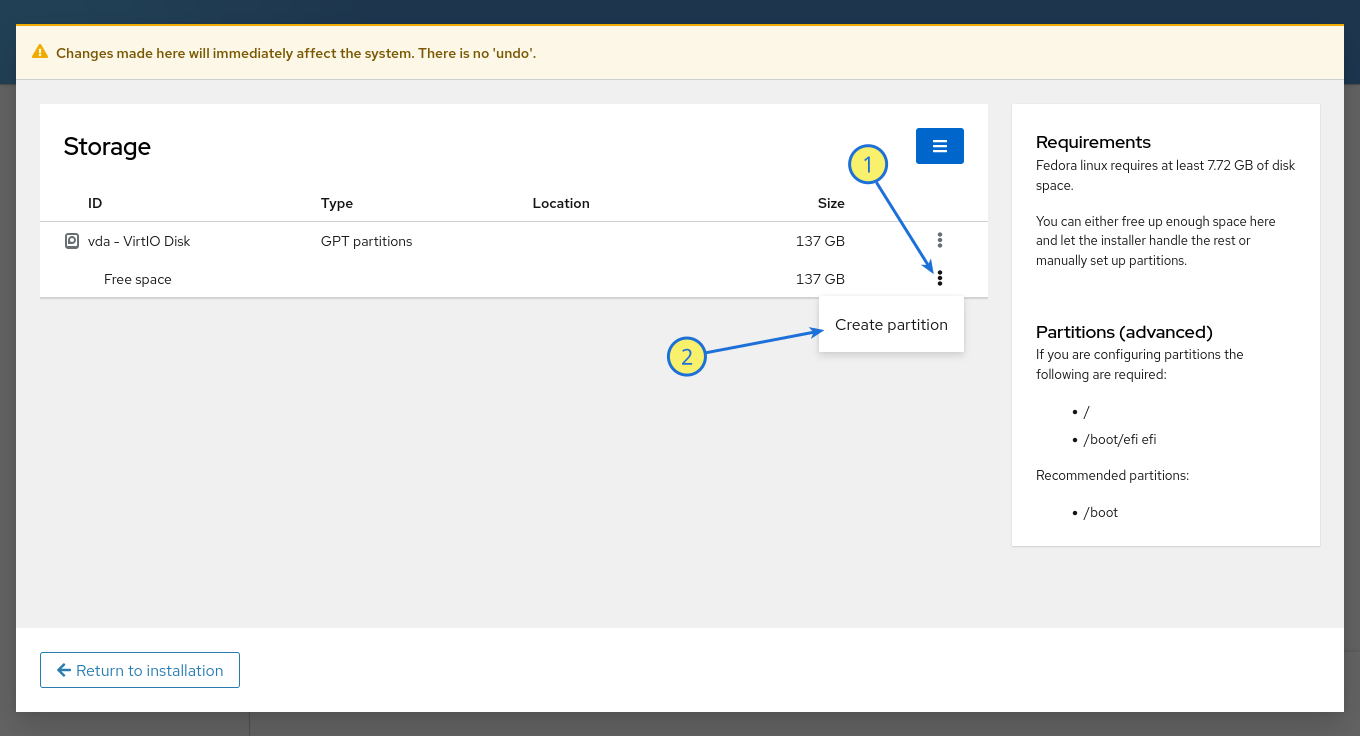
Now you need to create the required partitions. Click the **three-dot menu** (⋮) next to the free space and select **Create partition**.
Create the EFI System Partition (ESP)
- **Name**: `ESP` (or any preferred name)
- **Mount Point**: `/boot/efi`
- **Type**: EFI System Partition
- **Size**: 1 GiB

Click **Create** to finalize.
Create the Btrfs Partition. Again, click the **three-dot menu** (⋮) next to the remaining free space and choose **Create partition**.
- **Name**: `FEDORA` (or any name of your choice)
- **Mount Point**: _(Leave empty)_
- **Type**: BTRFS
- **Size**: Use the remaining available space
- **Encryption:** LUKS2
- **Passphrase:** Set a stronger passphrase with higher [entropy](https://rumkin.com/tools/password/) (password entropy > 60 bits is suggested).
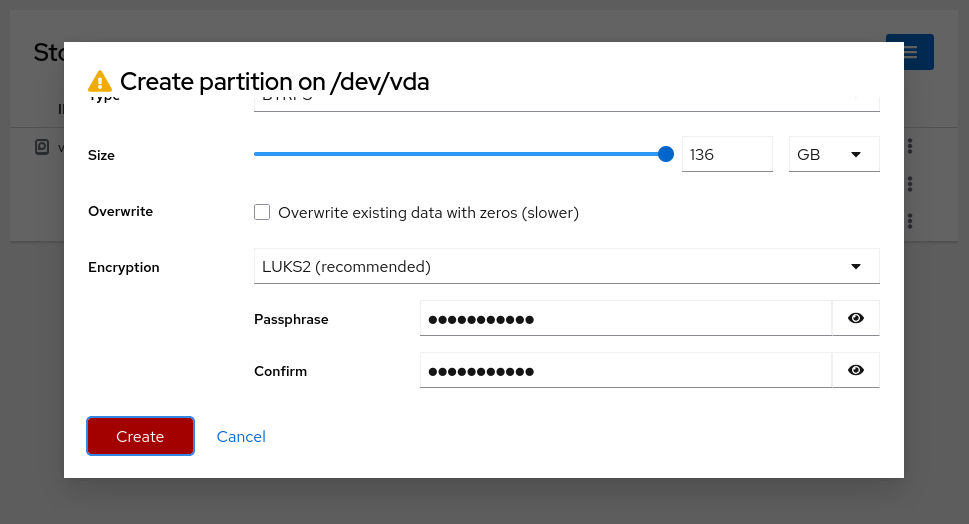
Click **Create** to continue.
Once the Btrfs volume has been created, begin adding subvolumes as needed.
Click the **three-dot menu** (⋮) on the line labeled **top-level** (**btrfs subvolume**) and select **Create subvolume**.

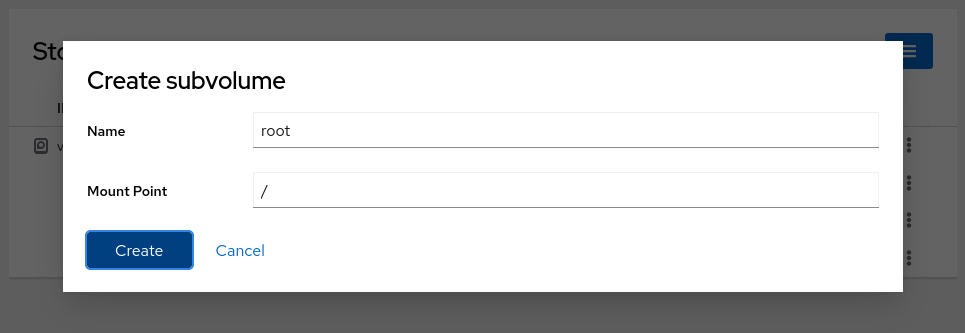
Create root subvolume:
- **Name**: `root`
- **Mount Point**: `/`
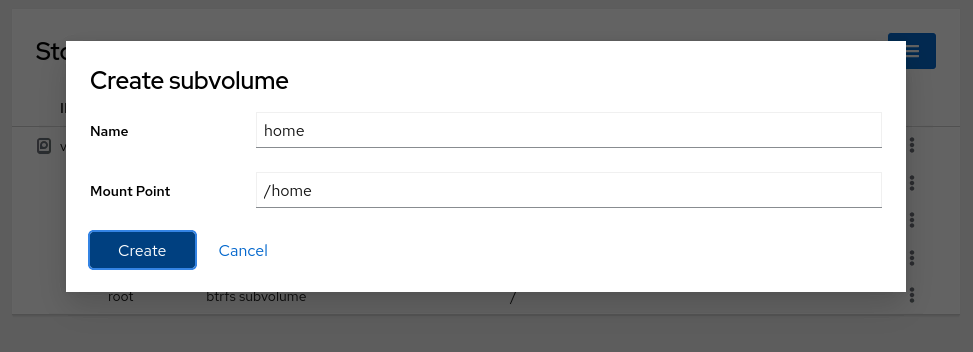
Create home subvolume:
Repeat the process:
- **Name**: `home`
- **Mount Point**: `/home`
Continue creating the remaining subvolumes. Here's a list of the remaining subvolumes you need to create, along with their names and mount points.
**NAME** **MOUNT POINT**
opt /opt
cache /var/cache
gdm /var/lib/gdm
libvirt /var/lib/libvirt
log /var/log
spool /var/spool
tmp /var/tmp
After creating all the subvolumes, the layout should appear as shown.

Next, click the **Return to installation** button.
The process may take some time, so please be patient. If everything is set up correctly, the setup screen will display a green check mark, indicating a valid storage layout.
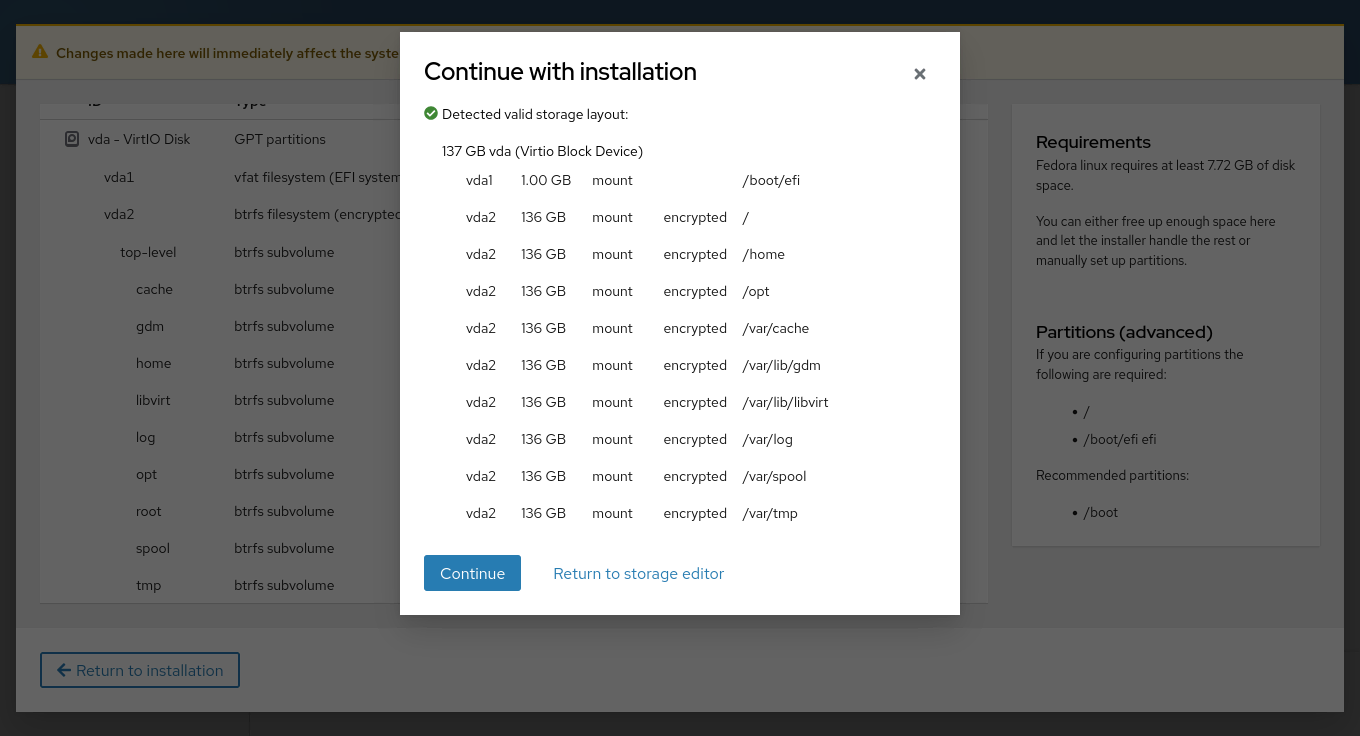
Click **Continue** to proceed.
Click **Next**, review your installation summary, and finally click the **Install** button. The Fedora Workstation 42 installation will now begin.
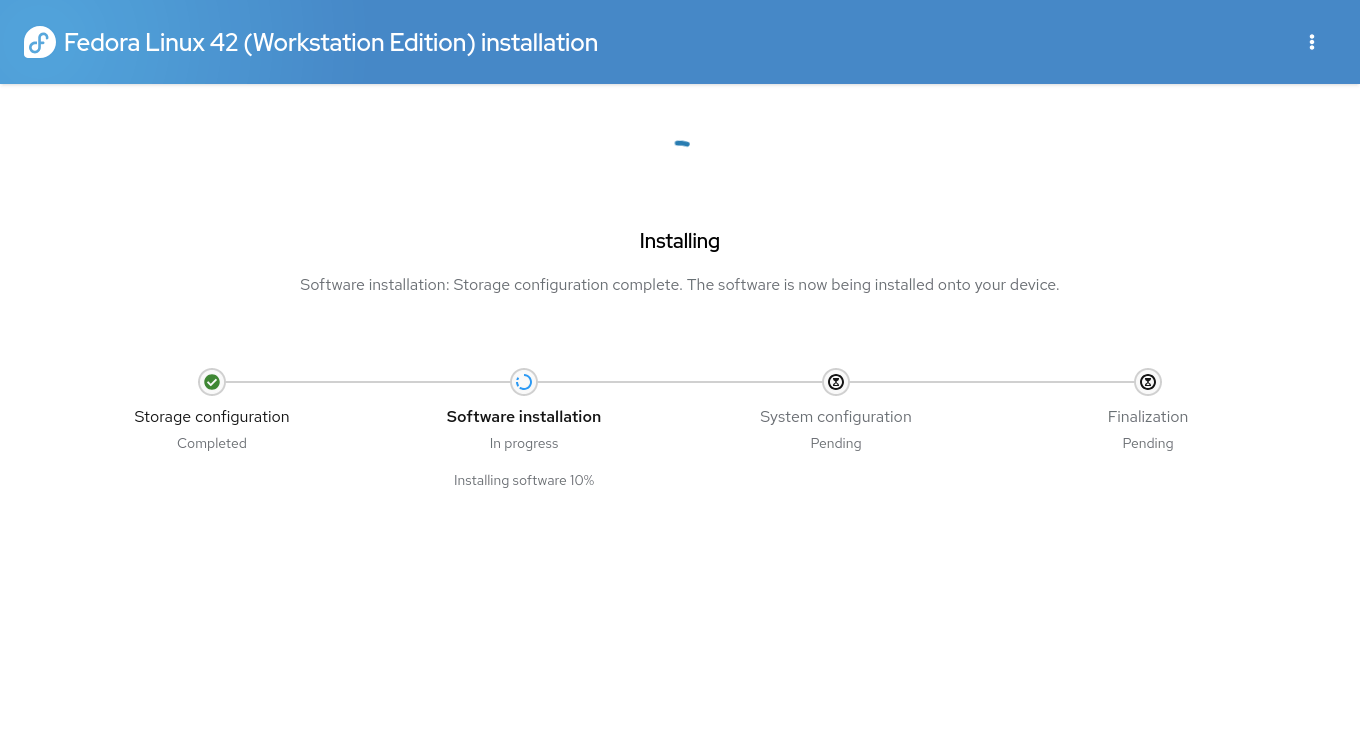
Once the installation is complete, click the **'Exit to Live Desktop'** button. **Please do not reboot just yet.** Return to the terminal window to complete some post-setup steps.
By default, the GRUB bootloader supports devices encrypted using the PBKDF2 key derivation function only. However, because I chose LUKS2 in the installer, it defaults to Argon2id. Since GRUB does not support Argon2id, we need to change the key derivation function to PBKDF2.
I chose LUKS2 with PBKDF2 over LUKS1 with PBKDF2, even though GRUB and most distro installers primarily support LUKS1. LUKS2 offers a more modern and flexible encryption framework, with better support for future cryptographic advancements. It provides enhanced metadata handling, larger key size options, and improved recovery features. While both LUKS1 and LUKS2 with PBKDF2 use the same key derivation function, LUKS2 ensures a more secure and extensible architecture, making it a better long-term choice for disk encryption. Even though GRUB does not yet support newer KDFs like Argon2id, LUKS2’s design allows for future improvements without sacrificing backward compatibility.
Your current installation is located at **/mnt/sysroot**.
First, find your LUKS device and save it in a variable. For me, it is /dev/vda2. Yours will be different.
```
# LUKS_DEVICE="$(cryptsetup status \
$(grub2-probe --target=device /mnt/sysroot) \
| grep 'device:' | awk '{print $2}')" \
; echo $LUKS_DEVICE
```
Now, check the current PBKDF being used by your LUKS device:
```
# cryptsetup luksDump $LUKS_DEVICE | grep -A7 '0: luks2'
0: luks2
Key: 512 bits
Priority: normal
Cipher: aes-xts-plain64
Cipher key: 512 bits
PBKDF: argon2id
Time cost: 4
Memory: 500525
```
You should see **argon2id** in the output. We need to change this to **pbkdf2**.
Run the following command to change the PBKDF to **pbkdf2**. For PBKDF2, the minimum iteration count is **1000**, and the maximum is **4294967295**. The more powerful your CPU, the higher the number of iterations you can set. Be mindful that higher iteration counts will result in a longer unlock time during boot.
In this example, I will set the iteration count to **500,000**, but you can adjust this value based on your system’s capabilities.
```
# cryptsetup luksChangeKey ${LUKS_DEVICE} \
--pbkdf pbkdf2 \
--pbkdf-force-iterations 500000
```
You will be prompted for your passphrase **three times**. The first time will authenticate, and the next two times will set the new passphrase (don’t change it; just use the same passphrase as before).
After the PBKDF has been updated, check again to confirm the change was successful.
```
# cryptsetup luksDump $LUKS_DEVICE | grep -A7 '0: luks2'
0: luks2
Key: 512 bits
Priority: normal
Cipher: aes-xts-plain64
Cipher key: 512 bits
PBKDF: pbkdf2
Hash: sha256
Iterations: 500000
```
You should now see **pbkdf2** as the key derivation function, with the iteration count set to **500000**.
Next, you need to enable Crypto Disk and Cryptomount. To enable full disk encryption at boot, we need to configure GRUB to load the necessary modules and properly handle the LUKS encryption.
Get the LUKS UUID:
```
# LUKS_UUID="$(cryptsetup luksUUID ${LUKS_DEVICE})" ; echo $LUKS_UUID
```
Add the **cryptomount** command to the GRUB configuration:
```
# sed -i.bkp "1i cryptomount -u ${LUKS_UUID//-/}" \
/mnt/sysroot/boot/efi/EFI/fedora/grub.cfg
```
Enable the required GRUB modules by editing the GRUB configuration file:
```
# echo 'GRUB_PRELOAD_MODULES="cryptodisk luks"' >> /mnt/sysroot/etc/default/grub
```
Ensure that cryptodisk is enabled for GRUB:
```
# echo 'GRUB_ENABLE_CRYPTODISK=y' >> /mnt/sysroot/etc/default/grub
```
Finally, regenerate the GRUB configuration to apply these changes:
```
# chroot /mnt/sysroot grub2-mkconfig -o /boot/grub2/grub.cfg
```
Now that everything is set up, you can reboot your system:
```
# reboot
```
Upon reboot, you’ll be prompted for your passphrase **twice**:
- The **first prompt** is before GRUB loads.
- The **second prompt** is before mounting the root filesystem.
**Please be patient** as the GRUB menu may take up to **15 seconds** to appear, depending on your CPU.
> **Note:** When entering the passphrase at the first prompt, there will be no '*' characters displayed. This is normal—just enter your passphrase correctly and press [Enter].
After entering your passphrase correctly, the installation process will continue. You’ll be prompted to set up your username, password, and other preferences.
Once this final step is completed, you'll be logged into **Fedora Workstation 42** with the all-new **GNOME 48** desktop environment.
## 3. Post-Installation Configuration
When you boot into Fedora, you might see the following message:
error: ../../grub-core/commands/loadenv.c:216:sparse file not allowed.
This usually happens when the /boot directory is part of a Btrfs subvolume instead of a separate ext4 partition. GRUB tries to read from or write to /boot/grub2/grubenv during boot to store settings like the last-selected kernel, but its Btrfs module is read-only and can’t write to the file—hence the error.
This message is harmless and doesn’t affect Fedora’s performance or stability. Your system will boot and function normally. The only downside is GRUB won’t remember your last boot option, and Fedora’s Hidden GRUB Menu feature may not work as intended.
The grubenv file controls whether the GRUB menu is shown. Normally, Fedora hides the menu unless the last boot failed or you're dual-booting. But if GRUB can’t update grubenv, it can’t show or hide the menu properly.
Since we’re setting up Fedora for snapshot and rollback, we want the GRUB menu to always appear anyway so we can boot from snapshots if needed. So we’ll be disabling Fedora’s Hidden GRUB Menu feature anyway, which means this issue doesn’t really affect us much.
While the error shows up every time you boot and can be a bit annoying, it’s purely visual and has no impact on the system.
To make sure the GRUB menu is always visible, run this command in the terminal:
```
$ sudo grub2-editenv - unset menu_auto_hide
```
Check your Btrfs filesystem details:
```
$ sudo btrfs filesystem show /
Label: 'FEDORA' uuid: e2adcde7-5739-4c37-beaf-0030cf25c5b5
Total devices 1 FS bytes used 6.54GiB
devid 1 size 127.05GiB used 10.02GiB path /dev/mapper/luks-17378d24-d4f9-4877-953a-f2126b17bce4
```
Your setup should look something like this:
```
$ lsblk -p /dev/vda
NAME MAJ:MIN RM SIZE RO TYPE MOUNTPOINTS
/dev/vda 253:0 0 128G 0 disk
├─/dev/vda1 253:1 0 954M 0 part /boot/efi
└─/dev/vda2 253:2 0 127.1G 0 part
└─/dev/mapper/luks-17378d24-d4f9-4877-953a-f2126b17bce4 252:0 0 127G 0 crypt /var/log
/var/spool
/var/tmp
/var/lib/gdm
/var/lib/libvirt
/var/cache
/home
/opt
/
```
The subvolumes will now appear as follows:
```
$ sudo btrfs subvolume list /
ID 256 gen 59 top level 5 path root
ID 257 gen 60 top level 5 path home
ID 258 gen 21 top level 5 path opt
ID 259 gen 55 top level 5 path cache
ID 260 gen 51 top level 5 path gdm
ID 261 gen 48 top level 5 path libvirt
ID 262 gen 60 top level 5 path log
ID 263 gen 48 top level 5 path spool
ID 264 gen 58 top level 5 path tmp
ID 265 gen 48 top level 256 path var/lib/machines
```
The last subvolume, var/lib/machines, is automatically created and used by systemd for managing lightweight containers through systemd-nspawn or portable services. Even if you're not using these features now, having a separate subvolume here allows better separation of system state and makes future containerization easier to manage.
Now, update your system:
```
$ sudo dnf update
```
Then, reboot to apply the updates:
```
$ sudo reboot
```
## 4. Prepare Home for Snapshots and Rollbacks
To ensure important user data is preserved when rolling back **Snapper snapshots** of the `home` subvolume, it's a good idea to separate certain application directories into their own subvolumes. This way, they remain unaffected by Snapper's undochange or rollback operations.
So, I’ll create a separate Btrfs subvolume for the Firefox configuration directory /home/$USER/.mozilla to prevent its data from being affected when rolling back or undoing snapshots of the home subvolume.
Since the /home/$USER/.mozilla directory already exists, I can't directly create a subvolume with the same name. So I'll first rename the existing directory, create the subvolume, then copy the contents back to ensure everything remains intact.
Run the following commands to move the existing .mozilla data, create the subvolume, and restore everything safely:
```
$ mv -v ~/.mozilla/ ~/.mozilla-old
$ sudo btrfs subvolume create ~/.mozilla
$ sudo chown -cR $USER:$USER ~/$(ls -A)
$ cp -arv ~/.mozilla-old/. ~/.mozilla/
$ rm -rfv ~/.mozilla-old/
$ sudo restorecon -vRF ~/$(ls -A)
```
A separate subvolume for the .mozilla directory has been created.
```
$ sudo btrfs subvolume list /
ID 256 gen 101 top level 5 path root
ID 257 gen 101 top level 5 path home
ID 258 gen 85 top level 5 path opt
ID 259 gen 96 top level 5 path cache
ID 260 gen 97 top level 5 path gdm
ID 261 gen 96 top level 5 path libvirt
ID 262 gen 101 top level 5 path log
ID 263 gen 96 top level 5 path spool
ID 264 gen 101 top level 5 path tmp
ID 265 gen 96 top level 256 path var/lib/machines
ID 266 gen 101 top level 257 path home/madhu/.mozilla
```
Now your Firefox data is isolated from Snapper snapshots of the home directory. Later in the guide, I’ll set up Snapper configs for both root and home to take full advantage of snapshot and rollback
## 5. Bypass the Additional Passphrase Prompt
When using full disk encryption, GRUB unlocks the /boot partition by prompting for a passphrase. However, this decryption isn’t passed to the initramfs stage, so the root (/) partition must be unlocked again — requiring the user to enter the passphrase twice.
To streamline the boot process, you can configure automatic unlocking using either a key file or TPM2. This section outlines both methods so you can choose the one that best suits your setup.
### 5.1 Using a Key File
If you’d like to unlock your LUKS-encrypted volume using a key file, follow this method. Secure Boot is **not** required.
Switch to the superuser:
```
$ sudo -i
```
Get the UUID of your LUKS device:
```
# LUKS_UUID="$(grub2-probe --target=cryptodisk_uuid /)" ; echo $LUKS_UUID
17378d24-d4f9-4877-953a-f2126b17bce4
```
Create the key file directory if it doesn’t exist:
```
# mkdir -v /etc/cryptsetup-keys.d
```
Generate a 4KiB random key file:
```
# dd if=/dev/random \
of=/etc/cryptsetup-keys.d/luks-${LUKS_UUID}.key \
bs=512 count=8
```
Restrict the key file’s permissions:
```
# chmod -c 0400 /etc/cryptsetup-keys.d/luks-${LUKS_UUID}.key
```
Add the key to an available LUKS key slot:
```
# cryptsetup luksAddKey \
--pbkdf pbkdf2 \
--pbkdf-force-iterations 500000 \
/dev/disk/by-uuid/${LUKS_UUID} \
/etc/cryptsetup-keys.d/luks-${LUKS_UUID}.key
```
Tell `dracut` to include the key file in the initramfs:
```
# echo "install_items+=\" /etc/cryptsetup-keys.d/luks-${LUKS_UUID}.key \"" \
> /etc/dracut.conf.d/cryptodisk.conf
```
Rebuild the initramfs:
```
# dracut -vf
```
Reboot the computer to ensure that everything is working properly:
```
# reboot
```
The passphrase should now only be required once, before GRUB.
### 5.2 Using TPM2
This method leverages your system’s Trusted Platform Module (TPM) to securely unlock the disk. **Secure Boot must be enabled**.
Switch to the superuser:
```
$ sudo -i
```
Verify Secure Boot is active:
```
# mokutil --sb-state
SecureBoot enabled
```
Check for TPM support:
```
# systemd-cryptenroll --tpm2-device=list
PATH DEVICE DRIVER
/dev/tpmrm0 MSFT0101:00 tpm_crb
```
Save the LUKS UUID to a variable:
```
# LUKS_UUID="$(grub2-probe --target=cryptodisk_uuid /)" && echo $LUKS_UUID
17378d24-d4f9-4877-953a-f2126b17bce4
```
Enroll the TPM2 device. When prompted for a passphrase, enter the same LUKS passphrase you set earlier.
```
# systemd-cryptenroll \
--wipe-slot=tpm2 \
--tpm2-device=/dev/tpmrm0 \
/dev/disk/by-uuid/${LUKS_UUID}
```
Confirm the TPM key slot:
```
# systemd-cryptenroll /dev/disk/by-uuid/${LUKS_UUID}
SLOT TYPE
0 password
1 tpm2
```
Add TPM device info to the kernel boot options:
```
# grubby --update-kernel=ALL \
--args="rd.luks.options=tpm2-device=/dev/tpmrm0"
```
Confirm the boot options were updated:
```
# grubby --info=DEFAULT
index=0
kernel="/root/boot/vmlinuz-6.14.2-300.fc42.x86_64"
args="ro rootflags=subvol=root rd.luks.uuid=luks-17378d24-d4f9-4877-953a-f2126b17bce4 rhgb quiet $tuned_params rd.luks.options=tpm2-device=/dev/tpmrm0"
root="UUID=e2adcde7-5739-4c37-beaf-0030cf25c5b5"
initrd="/root/boot/initramfs-6.14.2-300.fc42.x86_64.img $tuned_initrd"
title="Fedora Linux (6.14.2-300.fc42.x86_64) 42 (Workstation Edition)"
id="347197e21a7d4bc2b50c1a7675c2a395-6.14.2-300.fc42.x86_64"
```
Update /etc/crypttab:
```
# echo "luks-${LUKS_UUID} UUID=${LUKS_UUID} none tpm2-device=/dev/tpmrm0" \
> /etc/crypttab
```
Enable TPM module in dracut:
```
# echo 'add_dracutmodules+=" tpm2-tss "' > /etc/dracut.conf.d/tpm2.conf
```
Regenerate the GRUB config:
```
# grub2-mkconfig -o /boot/grub2/grub.cfg
```
Rebuild initramfs:
```
# dracut -vf
```
Reboot:
```
# reboot
```
You should now only be prompted once for the LUKS passphrase, before the GRUB menu appears.
## 6. Set Up Snapper, grub-btrfs, and Btrfs Assistant
To enable robust snapshot and rollback support on Fedora, I’ll install and configure Snapper for managing snapshots, grub-btrfs to integrate snapshots into the GRUB boot menu, and Btrfs Assistant for a simple graphical interface to view and restore snapshots. This setup allows Fedora to automatically create snapshots during package operations, giving you an easy way to undo changes or recover from issues.
Install the necessary packages using DNF:
```
$ sudo dnf install snapper libdnf5-plugin-actions btrfs-assistant \
inotify-tools git make
```
Set Up Automatic Snapshot Creation with DNF. Snapper integrates with DNF through a custom Actions file, which lets you define actions to be run before and after transactions. This is how Snapper creates pre- and post-snapshots automatically during package installs, upgrades, and removals.
Create a new actions file named snapper.actions. Copy everything from sudo to EOF, paste it into your terminal, and press [Enter] to create the file.
```
$ sudo bash -c "cat > /etc/dnf/libdnf5-plugins/actions.d/snapper.actions" <<'EOF'
# Get snapshot description
pre_transaction::::/usr/bin/sh -c echo\ "tmp.cmd=$(ps\ -o\ command\ --no-headers\ -p\ '${pid}')"
# Creates pre snapshot before the transaction and stores the snapshot number in the "tmp.snapper_pre_number" variable.
pre_transaction::::/usr/bin/sh -c echo\ "tmp.snapper_pre_number=$(snapper\ create\ -t\ pre\ -c\ number\ -p\ -d\ '${tmp.cmd}')"
# If the variable "tmp.snapper_pre_number" exists, it creates post snapshot after the transaction and removes the variable "tmp.snapper_pre_number".
post_transaction::::/usr/bin/sh -c [\ -n\ "${tmp.snapper_pre_number}"\ ]\ &&\ snapper\ create\ -t\ post\ --pre-number\ "${tmp.snapper_pre_number}"\ -c\ number\ -d\ "${tmp.cmd}"\ ;\ echo\ tmp.snapper_pre_number\ ;\ echo\ tmp.cmd
EOF
```
Now create Snapper configurations for the root (/) and home (/home) subvolumes:
```
$ sudo snapper -c root create-config /
$ sudo snapper -c home create-config /home
```
Verify the configurations:
```
$ sudo snapper list-configs
Config │ Subvolume
───────┼──────────
home │ /home
root │ /
```
Restore the correct SELinux contexts for the .snapshots directories:
```
$ sudo restorecon -RFv /.snapshots
$ sudo restorecon -RFv /home/.snapshots
```
Verify SELinux labels:
```
$ ls -1dZ /.snapshots /home/.snapshots
system_u:object_r:snapperd_data_t:s0 /home/.snapshots
system_u:object_r:snapperd_data_t:s0 /.snapshots
```
Enable user access to Snapper and synchronize file ACLs:
```
$ sudo snapper -c root set-config ALLOW_USERS=$USER SYNC_ACL=yes
$ sudo snapper -c home set-config ALLOW_USERS=$USER SYNC_ACL=yes
```
This allows your user account to list, view, and manage snapshots without requiring root privileges, and ensures file access permissions (ACLs) are properly synchronized.
Your subvolume layout will now include:
```
$ sudo btrfs subvolume list /
ID 256 gen 152 top level 5 path root
ID 257 gen 152 top level 5 path home
ID 258 gen 85 top level 5 path opt
ID 259 gen 148 top level 5 path cache
ID 260 gen 142 top level 5 path gdm
ID 261 gen 141 top level 5 path libvirt
ID 262 gen 152 top level 5 path log
ID 263 gen 141 top level 5 path spool
ID 264 gen 148 top level 5 path tmp
ID 265 gen 141 top level 256 path var/lib/machines
ID 266 gen 102 top level 257 path home/madhu/.mozilla
ID 267 gen 152 top level 256 path .snapshots
ID 268 gen 152 top level 257 path home/.snapshots
```
Prevent updatedb from indexing the .snapshots directories. Indexing is enabled by default and can lead to slowdowns and high memory usage when many snapshots are present.
```
$ echo 'PRUNENAMES = ".snapshots"' | sudo tee -a /etc/updatedb.conf
```
You can list snapshots as follows:
```
$ snapper ls # For root
$ snapper -c home ls # For home
```
At this point, no snapshots exist. They will be created automatically during package operations or manually when you trigger them.
Next, install and configure grub-btrfs.
The grub-btrfs package allows GRUB to detect and list snapshots in the boot menu, enabling you to boot into a snapshot in read-only mode before deciding to roll back.
Clone the repository:
```
$ git clone https://github.com/Antynea/grub-btrfs
$ cd grub-btrfs
```
Apply Fedora-specific changes to the configuration file: Copy the entire block from sed to config, paste it into your terminal, and press [Enter] to update the settings.
```
$ sed -i.bkp \
-e '/^#GRUB_BTRFS_SNAPSHOT_KERNEL_PARAMETERS=/a \
GRUB_BTRFS_SNAPSHOT_KERNEL_PARAMETERS="rd.live.overlay.overlayfs=1"' \
-e '/^#GRUB_BTRFS_GRUB_DIRNAME=/a \
GRUB_BTRFS_GRUB_DIRNAME="/boot/grub2"' \
-e '/^#GRUB_BTRFS_MKCONFIG=/a \
GRUB_BTRFS_MKCONFIG=/usr/bin/grub2-mkconfig' \
-e '/^#GRUB_BTRFS_SCRIPT_CHECK=/a \
GRUB_BTRFS_SCRIPT_CHECK=grub2-script-check' \
config
```
Install it:
```
$ sudo make install
```
You might see a "No snapshots found" message initially. This is expected since no snapshots exist yet.
Enable the service:
```
$ sudo systemctl enable --now grub-btrfsd.service
```
Your grub-btrfs setup is now finished. You can safely remove the cloned grub-btrfs directory.
```
$ cd ..
$ rm -rfv grub-btrfs
```
With that, all the setup and configuration needed to enable snapshot and rollback support on Fedora 42 is now complete. Snapper is ready to manage your system and home snapshots. GRUB will detect snapshots automatically, and you can restore them easily if something goes wrong. Your system is now snapshot ready.
## 7. Enable Automatic Timeline Snapshots
Now that everything is set up, you can enable automatic timeline snapshots. With this feature enabled, Snapper automatically creates a snapshot every hour. Once a day, the timeline cleanup algorithm removes older snapshots based on your configuration settings.
By default, timeline snapshots are enabled for both the root and home configurations. However, it's recommended to keep it enabled only for the root and disable it for the home volume to avoid excessive snapshot clutter.
```
$ sudo snapper -c home set-config TIMELINE_CREATE=no
$ sudo systemctl enable --now snapper-timeline.timer
$ sudo systemctl enable --now snapper-cleanup.timer
```
These timers are configured to create a snapshot every hour and clean them up once a day. You can adjust this behavior by editing the systemd timer units if you want more or fewer snapshots.
To customize the frequency, edit the timer files located in /usr/lib/systemd/system/ or override them in /etc/systemd/system/. See the [Snapper Arch Wiki](https://wiki.archlinux.org/title/Snapper#Automatic_timeline_snapshots) for examples.
That’s it! From now on, Snapper will automatically create one snapshot every hour and clean them up daily according to the timeline settings.
---
To showcase Snapper's features and real-world applications, I conducted a series of tests. If you're running Fedora in a virtual machine, I highly recommend trying these—or similar scenarios—to see firsthand how Snapper can help you recover from system-breaking changes.
You’ll find the test walkthroughs here: **[Snapper Tests](https://sysguides.com/install-fedora-with-snapshot-and-rollback-support#6-7-snapper-tests)**. Although they were originally performed on Fedora 40, they remain fully applicable to Fedora 42. The only exception is **Test #4**, which demonstrated a rollback using the GRUB menu.
For a version of **Test #4** tailored to this setup, check out this **[alternative test](https://sysguides.com/install-fedora-42-with-snapshot-and-rollback-support#7-rollback-using-btrfs-assistant-gui)**, where I walk you through performing the rollback using **Btrfs Assistant** instead.
## 8. Conclusion
With Fedora 42, you can now take full advantage of modern encryption standards, seamless recovery tools, and a polished GNOME 48 desktop—all while keeping your system secure and resilient. By opting for LUKS2 with PBKDF2, you ensure compatibility with GRUB while benefiting from a more flexible encryption framework. And with methods to bypass the second LUKS passphrase prompt using either a key file or TPM2, you can streamline the boot process without compromising security.
Pairing this setup with Btrfs snapshots and Snapper gives you powerful rollback capabilities that protect against misconfigurations, failed updates, and other system-breaking changes. Whether you’re setting up a secure workstation or just want peace of mind, this guide provides a solid foundation for a reliable and secure Fedora experience.
#linux #notes